Warning: Following my trades may be hazardous to your financial health. See Disclaimer.
Showing posts with label Off Topic Notes. Show all posts

Saturday, August 24, 2013

Not All Contacts Show Up In Gmail's Call Phone - Solved

I use a dozen of Google products daily for years, including making phone calls using Gmail's Call Phone.  I have had quite a few problems and issues with Google products, but amazingly Google has never ever address any of them, including this one which I will address.

When you click the Phone icon on the left pane of Gmail, the telephone keypad pops up on the lower right hand corner.  You can then enter the phone number to initiate a call, or you can start typing and the phone numbers of the matching Google Contacts would be displayed as hints and you can press Enter to initiate a call.  This is very handy as you won't have to remember any phone number that is in your Google Contacts.

Many months ago as Google continuously "improved" the integration among its products, I noticed some of my contacts stopped showing up on the "hint list" of the Call Phone keypad, especially notable were those of my immediate family.

I began to search for causes and solutions to no avail. People are having the same
problem but no one has the solution.   I then noticed that my family are in my Google+ circles and their Google profiles are automatically appended in Google Contacts.  May be that's why?  But one family member who is in my Google+ circle does show up on the keypad...  Soon I found a pattern, and thus the solution.  Ready?

It turns out that if a Google contact has a Gmail address *AND* you enter it in the email field of Google Contact form, it would not show up on the "hint" list of the Call Phone keypad!!!  An apparent software bug!  One solution is to cut the gmail address and paste it inside the notes field instead.

Another Google bug circumvented.


Saturday, June 29, 2013

Replacing the Front Driver Side Window Regulator For My E46 BMW

Back in 2011, both rear power windows of my 2001 BMW 323xi stopped working within 1 month of each other.  In the same year, my father's 2001 Lincoln LX also had 2 power window regulator broken.  It was amazing at the time how windows simply broke left and right.  I was too cheap and too lazy to replace them. I bought some power suction grips from Bed Bath & Beyond to keep the glass up without falling.  I have a child seat in the back, so most people thought I had the grips for my toddler. LOL.  Incredibly, the suction solution has been working well for over 2 years now.

Earlier this year, the front driver side power window regulator broke as well. So now I had 3 power suctions on 3 of my 4 windows.  It's now looking ridiculous.  After a few months of procrastination, I finally got around and got the DIY project going today.


The project took me over 3 hours to complete partly because I let my 6 year old participate, but really, I ran into 3 problems that took me a lot longer than expected.  If nothing else, these are the take-aways from this article:
  1. One bolt off the window glass got stripped/rounded and I couldn't loosen it.  It was my worse fear after reading a few DIY forum posts before I started the project.  I went to a nearby Home Depot and bought a new set of ratchet sockets -- it was a wishful thinking but it came true - it turned out it was the cheap socket that got rounded, NOT the bolt itself!
  2. It was difficult to slide the glass back onto the (new) regulator brackets such that the bolts on the glass fit snugly onto them.  It must have taken me 20 minutes just for this step and a lot of sweat and cut on the hands to finally get the glass fastened properly onto the regulator brackets.
  3. Just about all DIY forums failed to mention this, but the motor has a range.  Chances are, the motor range and the current window glass / regulator brackets position are out of sync.  The result is that you cannot raise the window all the way up before reaching the end of the motor's range. So after fastening the window glass to the new regulator, I had to lower the glass all the way down, remove the motor from the regulator, push the switch so the motor stoped at the lower range, and finally put the motor back onto the regulator.
There are a number of DIY on this topic on the web, but I'd like to document for my own record, as well as for anyone who needs another reference and comparing notes.

Tools You Will Need

  1. Non-marring prying tool, or a super thin flat-head screw driver
  2. 8 mm and 10 mm sockets, ratchet drive, AND extension
  3. Torx t-20 and Torx t-30 drivers or bits
  4. Optional WD-40
  5. Optional hair dryer

Replacement Part

I've read solutions on the web using zip ties, but I tend to shun these ideas. They would apply to the front windows only.  The zip-ties would probably wear out sooner.  And you can get a brand new replacement for $26.50 on eBay.  I'd choose to replace the regulator.

Steps


Carefully pry and pop out the side mirror switch from the door arm rest.  Remove the screw using Torx t-20 driver.
Carefully pry and pop out the tabs from the underside of the door arm rest.  Remove the 2 screws using a Torx t-20 driver.
Carefully pry and pop out the wood trim.  Note the 4 tab positions so you can confidently apply prying force.
Remove the 2 screws indicated using a Torx t-20 driver.  Note the front screw is much longer than the rear.
Yank out the door panel with force beginning from the top.  Note the indicated locations.
Here are all the tab locations shown after the door panel is yanked out completely.  But before the door panel is completely removed, we need to disconnect a few things...
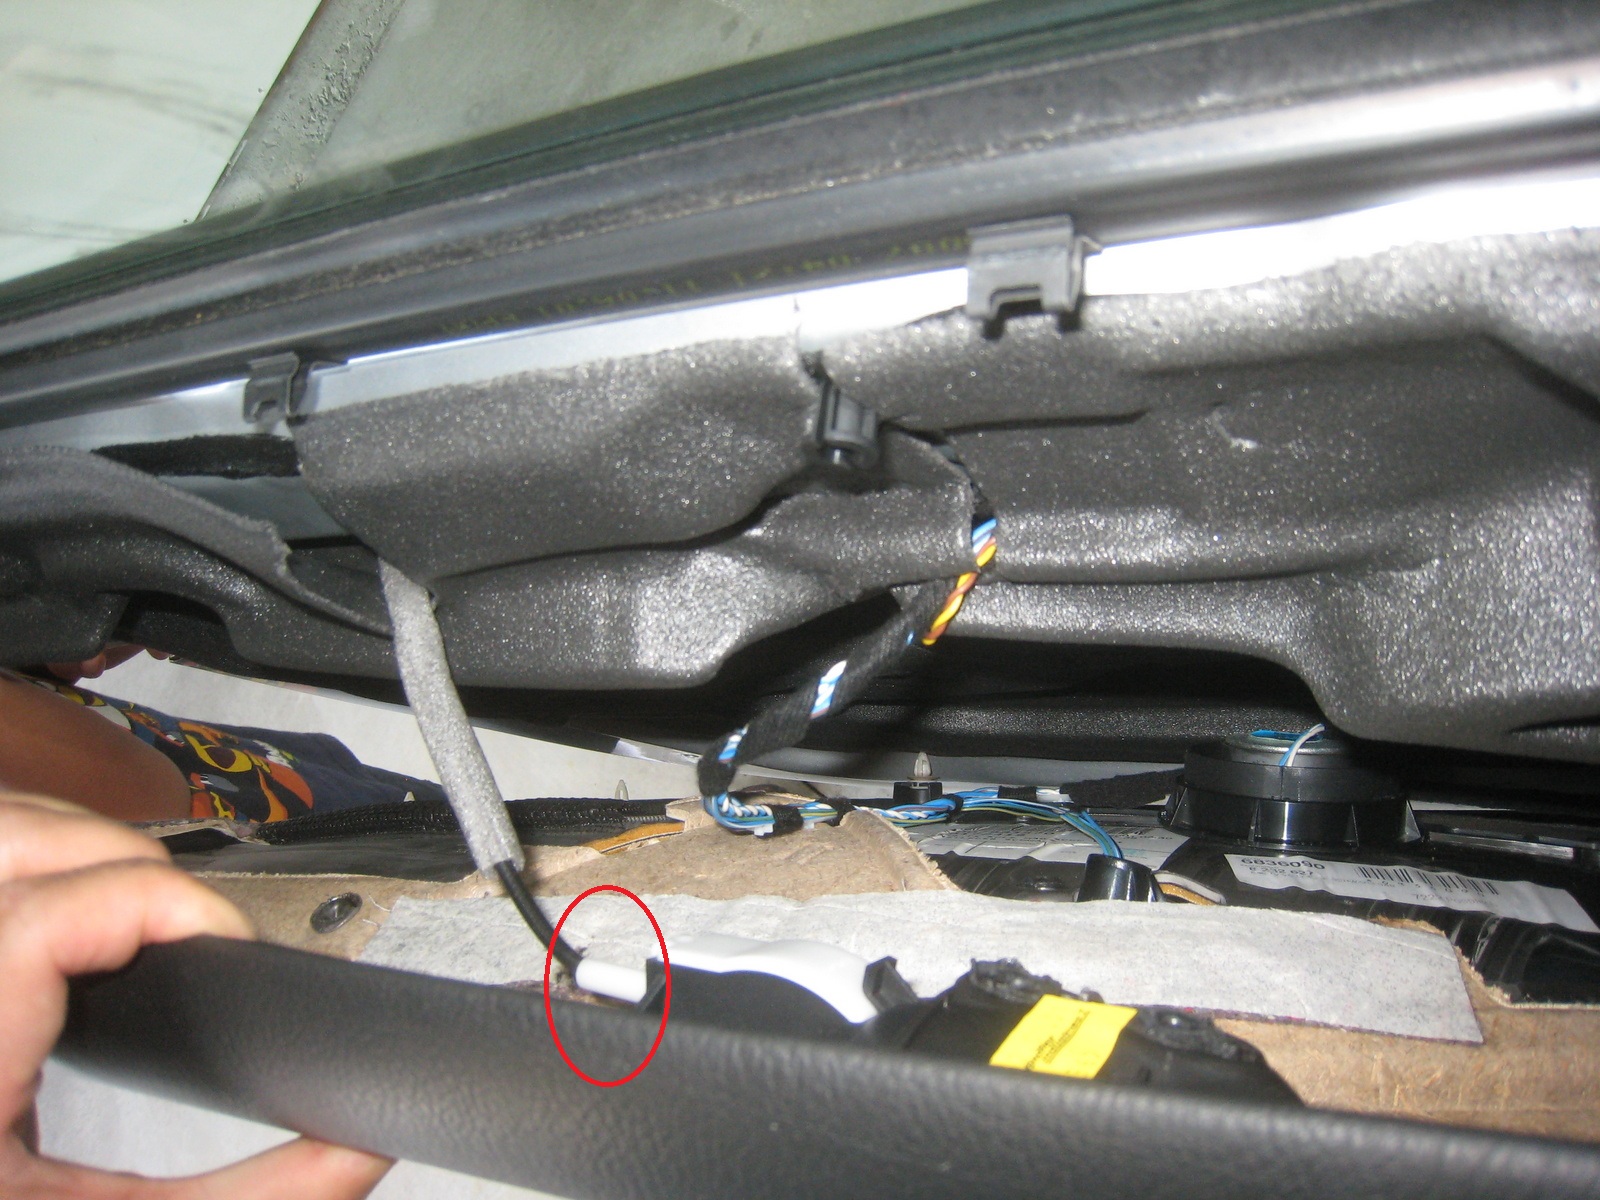
Yank out the door handle cable by grabbing the circled area and pull away from the door panel.
Disconnect the 2 speaker cable clips, and pull out the cable securing clip.
Disconnect the cable socket from the side mirror switch.  After this step, the door panel can then be completely removed.
Remove the 2 screws from this module using a Torx t-20 driver.
Disconnect the negative terminal off the battery before continuing!!!  Remove the 3 nuts from the air bag module using 10 mm socket.
Ensure the battery is disconnected, then remove the cable connector from the air bag module.  This step is a bit tricky. You need to use a very thin flat head screw driver and first pry loose the top tab as indicated by (1) by elevating it, and then pry loose the base as indicated by (2).
Here is a closer look at the connector after removal.  You can see the top tab is showing a gap from the rest of the connector.
At this point, it should taken no more than 30 minutes for the above easy steps.
Carefully remove the vapor barrier.   Use screw driver or other object to separate/cut the goo.  Don't use your hands; it can get messy.
It's a bit painful and may take 5 minutes to detach the vapor barrier.  The good news is, putting it back is much easier.
Temporarily connect the air bag module and reattach the negative terminal to the battery so that you can lower the window regulator using the power window switch.  You want the 2 bolts fastened to the window glass become visible at the locations indicated.  See the approximate height of the glass to achieve this. 
Using a 8 mm socket with extension to loosen the bolt.  This is where you want to be VERY careful.  Before you apply any force, make sure the socket is flush to the bolt which has rather shallow clearance. Pray hard that you don't strip/round the bolt!  Some WD-40 should also help.
Do the same for the other bolt.  Note how the bolt is secured between the red tab and the metal bracket because you're going to have to put it back the same way and it won't be easy.  The bolt and the red tab is secured with the glass, while the metal bracket is part of the regulator that moves up and down with the cable.  After both bolts are loosened, lift the glass all the way up to be out of the way, and secure it however you can -- in my case, I have the power grip :)
Detach the negative terminal of the battery and remove the airbag as before.  Remove the motor by first unplugging the electric cable, removing the 3 Torx t-30 screws, then twist counter-clockwise so the 3 prongs of screw socket clears the regulator bracket.  You can also remove the motor after removing the whole regulator apparatus like I did, but in hindsight, I think removing the motor first would give you more room.
Squeeze the cable securing tab indicated with blue circle and push in to release it.  Next, remove the regulator apparatus buy taking out the rear bar first.  Again, I think if the motor had been removed first, this step would have been a bit easier.
This is what the original regulator (with motor still attached) looks like as it comes out.  Retrieve the cable securing tab as indicated.  The replacement part won't come with one.
This is the back view of the original regulator.  Note the circled parts are where the bolts at the bottom of window glass get attached to the regulator.
Flipping the bracket from the cable and you can see that the housing for the metal cylinder on the cable is broken.
In fact, both housings were broken.  I managed to find one of the broken pieces.
If you did not remove the motor before removing the regulator, remove it now by first unplugging the electric cable, removing the 3 Torx t-30 screws, then twist counter-clockwise so the 3 prongs of screw socket clears the regulator bracket.
This is the $21.50 replacement I bought from eBay.  Put the front bar in first, then the rear bar.
Hang the regulator by inserting its protruding bolts into the 5 holes as indicated.  Attach the motor, airbag, and the negative terminal of the battery so by operating the windows switch you can move the brackets of the new regulator to the same place where you could see the bolts on the window glass when you loosened them before.
Now the time consuming part.  You need to manually lower the window glass so that each set of red plastic tab and the bolt of the window glass snugly sandwiches the metal bracket of the regulator.  Tighten the bolts carefully without stripping them.  You would most likely need to sync the motor range with the regulator position as mentioned earlier. 


Finally, put everything back in reverse order.  The only things I might add is that it may not be a bad idea to use a hair dryer to heat up the vapor barrier after you put it back on to make it stick nicely.  Also, you'd have to bang hard on the door panel to drive all the tabs and latches in.

Good luck with your own DIY projects!


Sunday, July 22, 2012

These Are Trying Times

I am not talking about the recession, the European debt crisis, or the massacre 2 nights ago at the Dark Knight premier in Colorado.  I am talking about my own personal life.  It is amazing how my world has been crumbling down within just the last 10 days.

10 days ago, my father had colonoscopy and is being scheduled for surgery.

My mother had her colonoscopy a week later on Wednesday, and had already had surgery in the ER and is being hospitalized.

I've been negotiating salary on a new position. On Thursday I received a phone call which outright turned down my request, not even meeting me somewhere in the middle.

Even for small things I've been having bad breaks.  On Friday my car had the annual state inspection done at Firestone, all was fine except for a bad braking light.  I wanted to change the light bulb myself, but the service rep threatened that I'd be assessed a $12 re-inspection fee.  So I paid $15 to have the little bulb put in.  I found out a few hours later that for obvious checks such as braking light, there should be no re-inspection fees if done within 5 to 30 days in just about all garages, including Firestone.  The dishonesty was depressing.

Just yesterday (Saturday), I received a letter from one of my banks notifying a $20 service charge for a failed deposit.  The reason indicated was "unable to locate account".  I subsequently found out that the account number on my own check from another bank was misprinted.  An 8 was misprinted as 3.  How often does thing like this happen, and one top of my bad breaks?!

My church is breaking down also.  The pastor has been financially abusive, disputing with the board, and has gone on an unannounced, 6 week vacation overseas.

Trading isn't helping either. I am more and more convinced that the stock market may be the one place where God and Satan stand on the same side.  Especially in light of everything else that had happened,  I am taking an indefinite break on day-trading.

Friday, April 13, 2012

About Standing Desks

I've never heard of "standing desk" until I read @ppearlman's blog post today.  On the other hand, I just realized I've been using one for weeks.


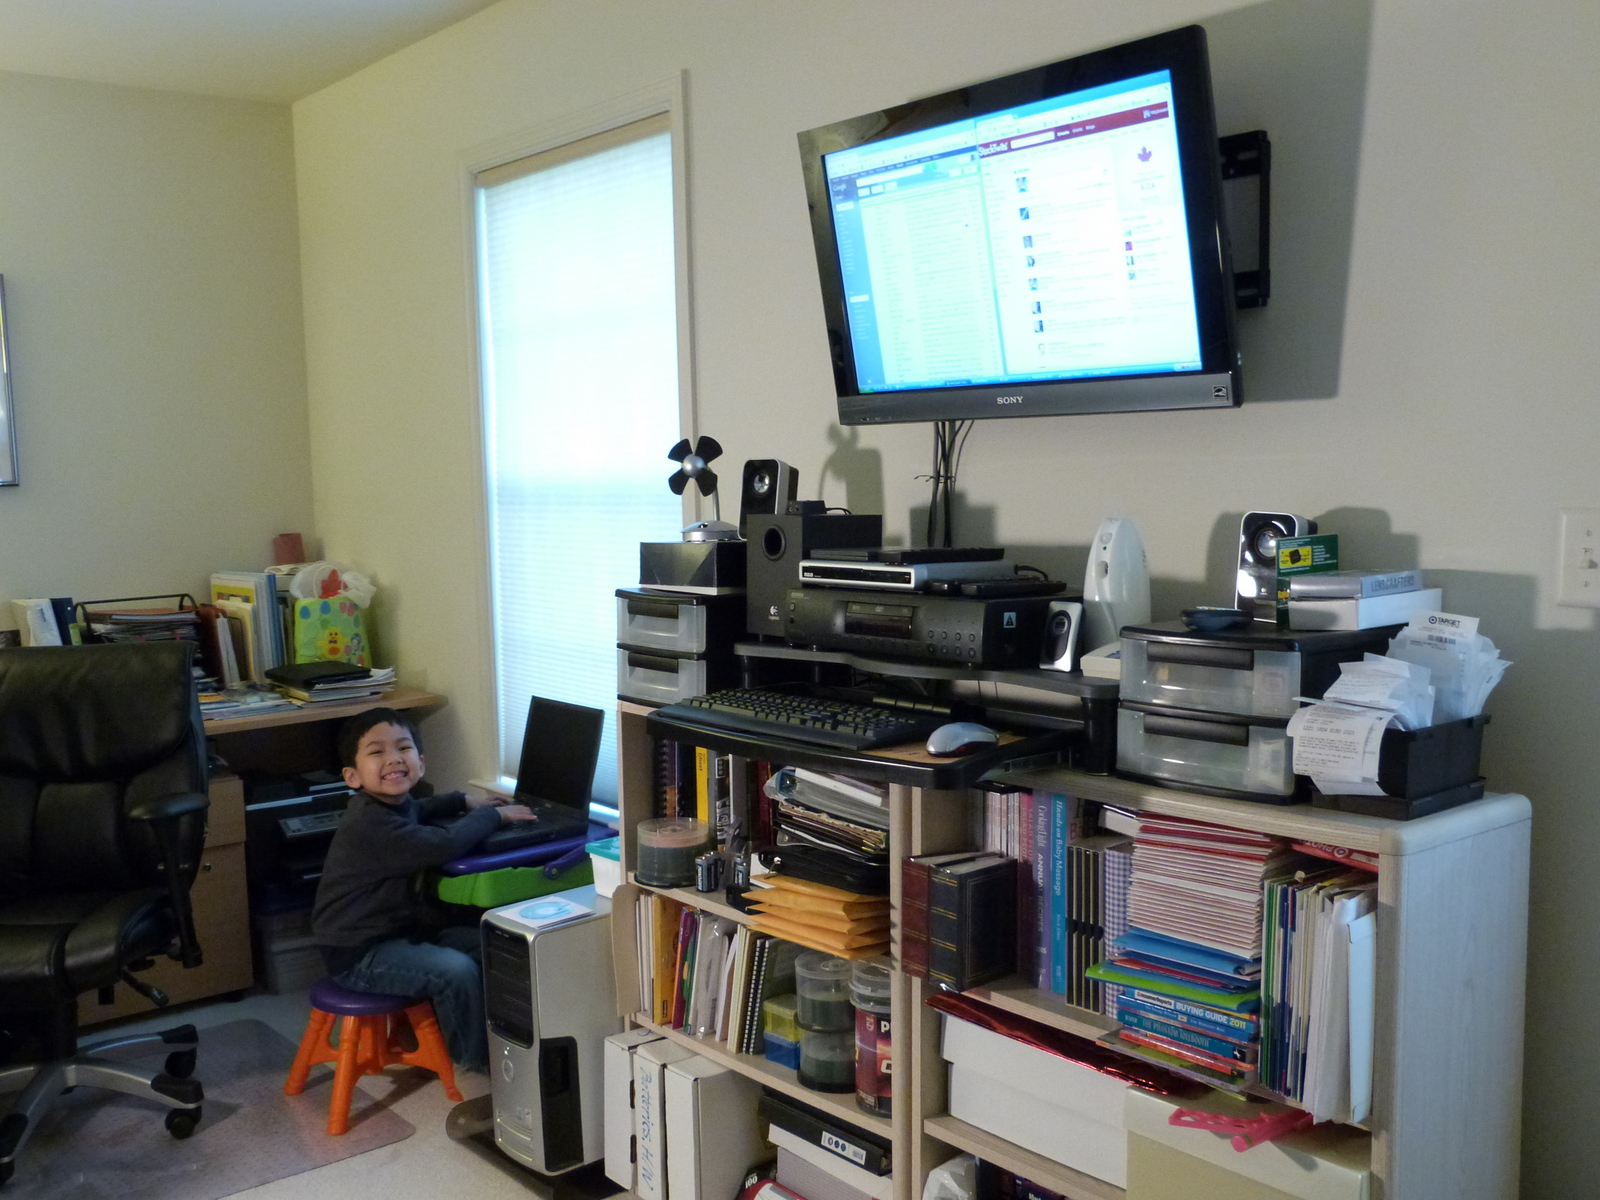
In my office I have an LCD TV on the wall above the bookcases.  One day after I replaced my old Dell XPS 400 desktop PC with a new one, I thought I'd use the old PC as a "media PC" using the TV as the display.  I can play DVD's, view videos and photos with my family, gain an extra PC desktop, etc.  One thing that worked out really well was that I was able to use the old monitor stand as is, for its sliding tray for keyboard and mouse.  The keyboard is positioned at just the right height (with the bookcases being the standard 36" you can probably guess my height, ha!)


As the old PC still contains most of my old files, I've had to access it quite a bit.  And in the process I fell in love with the setup so much that I actually  make conscious effort to use it more.  First, obviously I love the larger display.  Second, it is refreshing having to switch from prolonged sitting position to standing position from time to time, with the standing desk being just 2 steps behind my real working desktop.  By the way, this is my sitting desk in case you're curious.  And you can rightfully imagine that it's normally a bit more messy than this. Ha!


I didn't realize there are health benefits for standing desks, and that employees at Google and Facebook had to be "promoted" to use one.  I guess I should promote myself and use it a lot more regularly!

By the way, personally I feel it is in fact more tiring standing than walking/hiking.  Heels and ankles really get stiff quickly and I'd need to alternate my standing leg and perhaps stand my my toes for a change.    I wonder if there is a physiological reason for this.

UPDATE: My skepticism above was somewhat validated by Cornell University's take:
The use of a height adjustable worksurface for sitting and standing work is becoming fashionable. However, there is scant evidence that sit-stand furniture has cost effective benefits. The evidence suggests that there may be a reduction in back discomfort, but the research for this has not used adequate comparison groups (e.g. testing people who stand for the same time at the same frequency without doing keyboard/mouse work). There is no evidence that sit-stand improves wrist posture when keying or mousing. Logically, the real benefit of sit-stand is just that, changing between sitting and standing. But standing in a static posture is even more tiring than sitting in a static posture, so movement is important. We recommend that the most cost effective way to obtain the benefits from sitting and standing is for people to sit in a neutral work posture and then intermittently to stand and move around doing other things, like filing papers, making phone calls, getting coffee, making photocopies etc.) rather than trying to keyboard or use a mouse while standing.

Saturday, April 07, 2012

Migrating (Export/Import) from The Palm Desktop to Google

I finally decided to decommission Palm Desktop as my personal digital assistant.  Well, I ditched the Palm T3 PDA months ago for my HTC android phone, but I continued to use the Palm Desktop software for its Calendar, Contact Management, To-Do's, and Memos daily organizational features.   I've procrastinated all this time, aside from the fact that I'm so accustomed to the Palm Desktop's superior interfaces, it is because I was very disappointed with Google Calendar's search feature.  Yes, I did say  "search" feature -- Google's bread and butter.  For some reason, Google Calendar's search would only return 6 results, even though the banner would advertise there are, say, 136 results.  There is no way to navigate or gain access to the rest of the search results.  If I go into advanced search where I specify the date range, it would display up to 22 results, but still there is no way to access the rest of the search results.   I've reported and complained to Google over a year ago (and someone else did the same back in 2009), but no response, no acknowledgement from Google, and of course, no fixes.

I've imported Palm Desktop's Tasks into Google Tasks and Palm Desktop's Contacts into Google Contacts and sync'd both to my HTC android phone for a few months now, but I continue to use the Palm Desktop for the Calendar function.  As a result, I still habitually access the Contacts on the Desktop and modify them, thinking I'll just do another round of export/import from time to time.  Well, just the other day when I was at the doctor's office, I wasn't able to access an important piece of information on my HTC phone because the more current information was on my Desktop.   So I said enough is enough.  I'm ditching Palm once and for all.

Taking advantage of the Easter long weekend, I did tons of work.  Among other things (upgraded my new PC,   did my tax return, etc.), I migrated out of Palm Desktop into Google which I married to long ago.  I use Google technology extensively daily:  Gmail, Google Voice, Picasa, Blogger, Contacts, Tasks, Documents, Map, Chrome, Android..., and of course Search.  And from today on, I'll be using Calendar as well.

I document the procedures for the migration below.  I use Palm Desktop version 4.x.

Palm Desktop Calendar to Google Calendar

Google does not accept Palm Desktop's export file.  We used to be able to use Yahoo Calendar as an intermediary; unfortunately, Yahoo no longer support Palm Desktop's export files.  Luckily, there's a free online tool which actually works even better.
  1. In Palm Desktop Calendar view, File -> Export
  2. Set the Export Type to "Date Book Archive (*.dba)" and click "Export"
  3. Next we need to convert the export file to CSV files that Google Calendar can import
  4. Go to http://www.palm2csv.com/convert/ 
  5. Click the "Choose File" button and specify the export file you created
  6. For Default Settings, select "Google Calendar".  Among other thing, this will limit each output CSV file to no larger than 5000 line items.  As a result, you will get multiple output files if you have a large calendar file.
  7. In Google Calendar, click on the down arrow next to "Other Calendars" and select "Import Calendar".
  8. Click "Choose File" and specify one output CSV file, and then click "Import".
  9. It will take a few minutes, be patient.
  10. Dismiss the message at the end if you get one.
  11. Repeat until all of the output CSV files have been imported.

Palm Desktop Contacts to Google Contacts

I assume you're like me, that you'd like to reserve the categories of your contacts.  To do so, follow these steps.
  1. In Palm Desktop Contacts view, systematically pick one of your contacts Categories
  2. Edit -> Select All
  3. File -> Export vCard
  4. In Google Contacts, click "Import Contacts..."
  5. Specify the vCard file, then click "Import"
  6. Select the resulting auto-named group "Imported xx/xx/xx", and rename the group to the name of your category
  7. Repeat until all Categories have been imported.
One bug in the process is that if you have any "=" character in your contact's Note field, it would be cut off by the export program.   I found it out the hard way.  So make sure you scan through and replace the "=" characters before exporting.

Palm Desktop Memo to Google Documents

This is actually the most painful, as the steps are manual step intensive.  There are also lots of idiosyncrasies with the line break conversions.  For example, while the initial view with Windows Notepad on the exported file looks OK, once you save it and reopen it, all the line breaks are gone. You end up with all of the line concatenated without even a space character separating them.  If you had done with the same using Microsoft Word, depending on how you save it, you could get the same disaster, or upon importing to Google Document, all blank line would become 3 blank lines.  Following the steps below would save you some pain, but you'd still have to endure a lot of pain migrating your Memos.
  1. In Palm Desktop Memos view, systematically pick one of your memos categories
  2. Edit -> Select All
  3. File -> Export
  4. Select "Comma Separated" for Export type and enter file name with .txt extention
  5. When prompted, deselect "Private" and "Category" fields and click OK to file 
  6. Right click the file in File Explorer and Open With Microsoft Word (not Notepad or Wordpad!)
  7. With CSV format, each Memo is demarcated with quotation mark at the beginning and the end, so to help us visually, let's replace the demarcation with something like "________________"
    1. To do so, Edit -> Replace
    2. Under Find What, enter "^p"
    3. Under Replace With, enter ^p^p_________________________^p
    4. Click Replace All
  8. File -> Save As
  9. IMPORTANT:  Select "Plain Text (*.txt)" for "Save as type"
  10. Enter file name and click Save
  11. Here's your chance to avoid extra blank line between every single lines.  You'll get a File Conversion dialog box.  Check "Insert line breaks" and then click OK
  12. In Google Documents, click the Upload icon next to the CREATE button
  13. Select Files
  14. Select the .txt file you just saved, and click Open
Pain in the neck.  Tell me about it. 

After this grueling process, you can go and designate the line below the "____________________" as Heading 1 so that you can create a table of content at the beginning of each document you upload.  Essentially, each Google Document corresponds to a Memos category, and each Heading corresponds to a Memo.

Walk-Around for Google Calendar's Search

As far as a walk-around for Google Calendar's sub-par search feature when you need to access more than the 6 most recent results, do the following:

  1. Go to advanced search by clicking the down arrow to the right of "Search Calendar"
  2. Enter the key words in the "What" field
  3. Enter today's date as the "to" date of the date range
  4. Specify the earlier possible starting date for the range
  5. Click the search icon
  6. You'll get up to 22 search results displayed
  7. Note the date of the last displayed result and use it's next date as the starting date for the date range and repeat.


Sunday, March 25, 2012

Extended Warranty and Repair Service

Over the weekend I bought a bargain brand new Lenovo desktop PC from Staples for under $200 and 2 2GB of DDR3 memory at $4.50 each.  Allegedly this was a Black Friday leftover inventory.  I was happy but that's beside the point.  I bought Staples' 3 year EasyTech computer protection plan on the spot due to their convincing up sell tactic.   After some research today, however, I plan to cancel the plan due to some horror stories I read, as well as more competitive pricing and service elsewhere.  Although I don't have first hand experience with either of the two companies below, I've decided to use them as vendor of choice in the future until better choices present themselves.  Just for reference for myself.

For extended warranties:  SquareTrade.

  • A+ BBB rating. 
  • Free shipping. 
  • 5 day service guarantee.  
  • 24x7 online claim filing.  
  • Discount coupon codes are also available from time to time.

For computer repairs:   Secure Remote Support.

  • 24x7 secure remote assistance.  
  • No fix no fee policy.
  • Still pricey but better than most.


Wednesday, February 22, 2012

Keyboard Shortcuts - Gmail and Twitter

I use Gmail and Twitter extensively, like 14 hours a day.  Any shortcut to get the same thing done with less effort would go a long way.  Avoiding mouse clicks would also make me less susceptible to carpal tunnel syndrome. Fortunately there are some useful ones available.

For Gmail:

  • 'g' + 'p': Go make a phone call
  • 'g' + 'k': Go to Tasks
  • 'c'      : Compose 
  • 'j'      : Move cursor up in the list
  • 'k'      : Move cursor down in the list
  • <Enter>  : Open the message at current cursor location
  • '#'      : Hash/delete message and return to list
  • 'r'      : Reply
  • 'a'      : Reply to all
  • 'f'      : Forward
  • 'u'      : Back to list
  • '?'      : Show all keyboard shortcuts
Unfortunately, there is no short cut to "mark all as read" for junk mails.  For that one, if I want to avoid the mouse, I'd have to do a '.' + <down arrow> + <enter>,  borderline useful but that lets my fingers stay on the keyboard.

As you can see, I use Google product extensively.  Gmail is my landline phone.  Google Tasks are useful because it can sync with my Android phone.  The only thing I loath about Google is Google Calendar, whose Search feature is retarded (excuse my language, can't think of a better word).


For Twitter:

  • '.'      : Load new tweets 
  • 'n'      : New tweet

That is all I need, really.  Stocktwits automatically loads new tweets, but I actually like the twitter implementation better: that I get an indication automatically that there are new tweets without loading them automatically, lest it is quite stressful to read an existing tweet while the new ones keep pushing it down.

The rest of the twitter shortcuts can also be accessed by typing '?'.   I paste the list here since it's short and I could get a screen shot of it.

Finally, to switch between Gmail and twitter (or cycle through any other tabs currently open in the browser), simply do <Ctrl> and <Tab> at the same time.

Monday, February 06, 2012

How To Replace The Air Filter On A BMW 3 Series E46

You can buy a Fam CA9007 Flexible Panel Air Filter from Amazon.com.  I paid $12.93 with free shipping (Amazon Prime).  The process took me 40 minutes, including trial and error, but with the tested procedure documented below, you should do much better.

Some people may say it is as simple as unclip all 5 clips, take out the old air filter, put in the new filter, and then fasten all clips back on.  However, having tried it myself, I have concluded that it is very hard to loosen and fasten clips #4 and #5 without removing the whole air filter chamber.  Some people claim they could just pry open the cover without loosening clips #4 and #5 and jam the new filter in, but I can assure you that it is impossible without damaging the new air filter.  Therefore, the steps below are necessary to properly replace the air filter.
  1. Remove the 2 bolts shown in green circles
  2. Loosen the hose clip (also circled in green) using a screw driver
  3. While pressing down the metal lever, pull out the electric cable plug
  4. This is the hardest part. An adjacent unrelated hose is secured to the air filter chamber via a heavy duty rubber latched to the chamber as shown below in photo on the left.  It is very hard to yank it out.  If you have a pair of thin pliers as shown, that'd be what I would recommend.  Stick both tips inside the rubber loop, stretch it open, and pull the pliers at the same time. The photo on the right shows the after-picture.


  1. Pull the hose out
  2. Lift and pull the air filter chamber out of the upper and lower intake boots.   The photo on the left is the resulting engine cavity with the air filter chamber removed.  The photo on the right is the air filter chamber.

  1. Unclip all 5 clips and remove the cover
  2. Replace the filter.  The new filter comes with extra layer of black foam at the bottom.  It is not easy to squeeze the filter in nicely and close the cover.  Some efforts are needed to tuck in the slacks while closing the cover at the same time.
  1. Reverse the steps to put the air filter chamber back.

Saturday, January 14, 2012

How to Place the Ooma Hub (or Telo) Behind Your Router


I got my mother an android smartphone for her birthday.  One of the great apps I like is the IP Webcam.  I've experimented it successfully on my own network at home.  By way of port forwarding, I can use a web browser from anywhere in the world to view what the smartphone is seeing.  The typical application is home security/surveilance.  But for me, being able to see whatever my mother sees at her home 180 miles away would be instrumental in helping her solve daily problems.
Unfortunately, what worked for my set up didn't work on hers.  Same phone, same router, and the same ISP, but somehow I just couldn't make port forwarding work in her home.  I couldn't even access her router remotely even though such feature was enabled for her router.  Finally, I found the culprit -- she had an Ooma Hub (for VoIP telephony) placed between the cable modem and the wifi router.  This is the default setup for Ooma and works for perhaps 95% of the users, except for the 5% who run network servers from their home networks.  The Ooma Hub had either blocked incoming ports and/or masked the external IP address (http://canyouseeme.org showed a complete different external IP addresses with and without the Ooma Hub).  I am not quite sure.  The bottom line is that it would not work with the default recommended setup.
Some suggested designating the local IP address of the wifi router as the DMZ in the Ooma configuration.  But there have been complaints that it didn't work, so I didn't bother trying it, even though I didn't get to the bottom of it.
I took the other approach -- placing the Ooma hub behind the wifi router.  I made it to work.  Since I couldn't find this documented anywhere else, I am hereby doucmenting the solution that works for me.
  1. Access the Ooma Hub's configuration page at http://setup.ooma.com
  2. Change its Network Connection setting from Automatic to Static IP Address.
  3. Assign the Ooma Hub a static local IP address outside of your wifi router's DHCP pool, say 192.168.1.101, assuming your router's DHCP IP pool ranges from 192.168.1.2 through 192.168.1.100.
  4. Assign your router's IP address as Ooma Hub's static DNS Server and Router (gateway) addresses.
  5. Make sure you click "Update" after you've made the above changes.
  6. Access your router's configuration page, and specify the Ooma Hub's new static local IP address (e.g. 192.168.1.101) as the virtual DMZ host. Make sure DMZ is enable and the changes are applied.
  7. Power down both the Ooma Hub and the router.
  8. Reverse the current physical connections so that the the cable modem connects directly to the router's uplink socket, and the Ooma Hub's "Modem" socket connects to one of the router's available LAN sockets.
  9. Connect one additional cable from the Ooma Hub's "Home" socket to one of the router's available LAN sockets.
  10. Power up the router and wait for it to reach steady state.
  11. Power up the Ooma Hub and wait for the blue light.
  12. That should do it.
  13. To access the Ooma Hub's configuration page, you'd now have to use the static local IP address (e.g. http://192.168.1.101 in our running example) instead of http://setup.ooma.com .   If you have a more advanced router, you would be able to fix this problem by adding translation.  But personally I'd rather not do that and keep the changes minimum in case I need to restore the orignal set up in the future.
Good luck!